In this tutorial, we will show you how to unlock the bootloader on Sony Xperia 1 II and then root it via Magisk. While Sony devices aren’t among the most development-friendly, yet it has made sure that users don’t end up facing any trouble when trying their hands on the unlocking process. So this might bring up a pretty obvious yet important question: why does one need to carry out the aforementioned task. Well, here is the thing. The Google-owned OS is always known to provide a plethora of tweaks. We aren’t only talking here about the icon packs and themes, you could even install a new custom build ROM.
Also Read
Likewise, you could also root your device and flash tons of modules and frameworks. But for all of this to be effectively carried out, there is just one prerequisite that your device needs to qualify. And that is an unlocked bootloader. In this guide, we will help you achieve just that. So without further ado, here are the required instructions to unlock the bootloader on your Sony Xperia 1 II and then root it via Magisk. But first, let us get you aware of the risks and advantages of bootloader unlocking and rooting your Xperia device. Please go through it once and make your decision accordingly.
Advantages of Bootloader Unlocking and Rooting
Once you have unlocked the bootloader on your Xperia device, you have literally opened the gates to a plethora of tweaks. To begin with, you could install a custom ROM or GSI ROM onto your Xperia 1 II device. Likewise, you could replace the device’s stock recovery with a custom one like TWRP. This in turn will provide you with a plentitude of other options like creating a Nandroid backup, installing ZIP and IMG files, etc.
Along the same lines, you could even gain administrative privileges and carry out system-level tweaks. This would be achieved by rooting your device via Magisk. Once rooted, you could then try out Magisk Modules, Substratum Themes, Xposed Framework, and tons of other customizations. While all these are definitely worth commendable but comes with a few risks as well. Given below are some of the dangers associated with such tweaks.
Risks of an Unlocked Bootloader and Rooting
First and foremost, unlocking the bootloader might make the device warranty null and void. Along the same lines, it will wipe off all the data from your device. Some apps like Google Pay and Pokemon Go might no longer work. Others like Netflix won’t be able to stream content in HD (due to the fact that Widevine L1 will be degraded to L3). You might also lose the ability to receive official OTA updates.
The entire process might itself be risky and could even brick your device. So with that, you have got a pretty decent idea regarding the works and risks of these tweaks. if you are ready to proceed ahead, then here are the required instructions to unlock the bootloader and root Sony Xperia 1 II using Magisk.
How to Unlock Bootloader and Root Sony Xperia 1 II
There are a few settings that you need to enable on your device and a few files that need to be downloaded. Please go through the below-requirements section and carry out the said task.
Warning
Prerequisites
- Create a complete device backup. This is because the unlock process will format all the data from your device.
- Next up, download and install the Android SDK and Platform Tools on your PC. This will provide you with the necessary ADB and Fastboot files.
- Install the Sony USB drivers on your PC as well.
- Download and install the XperiFirm software on your PC. This will be needed to download the stock firmware file for your device.
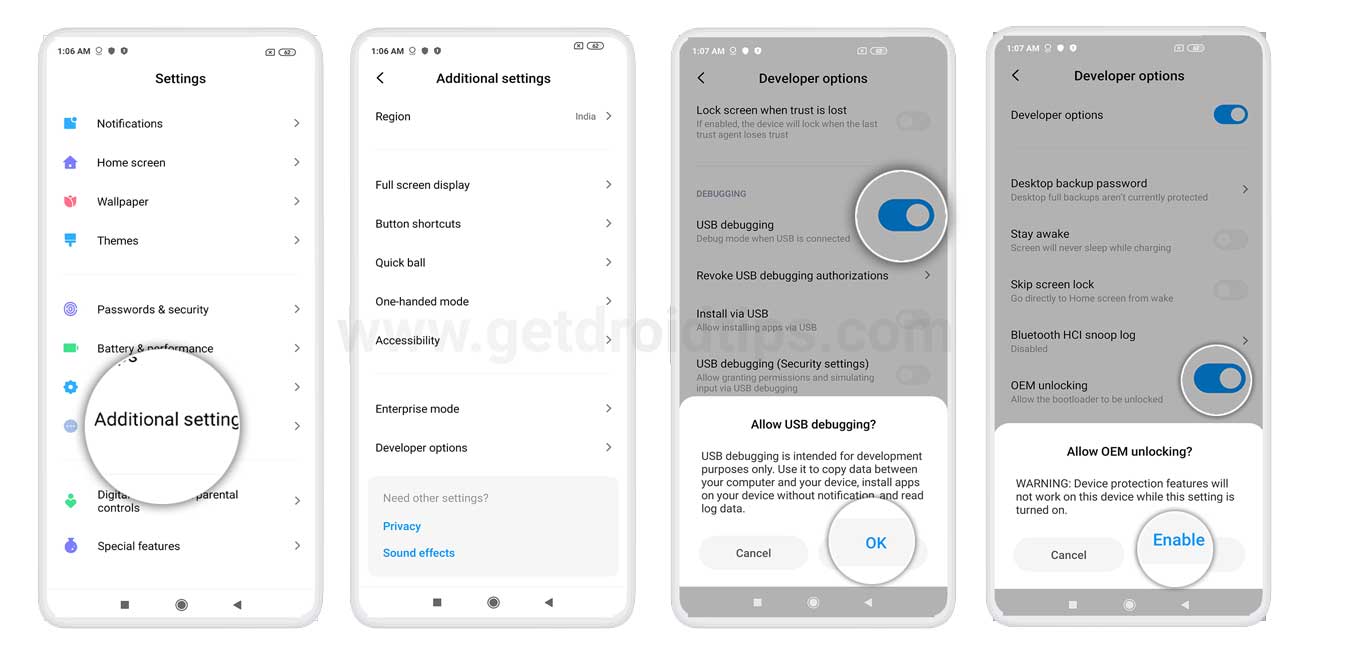
- Also, enable USB Debugging and OEM Unlocking. The former will make it easy for your PC to recognize the device in ADB mode. Whereas the latter will allow you to unlock the device’s bootloader. To enable both of them, head over to Settings > About Phone > tap on Build Number 7 Times > Go back to Settings > System > Advanced > Developer Options > Enable USB debugging and OEM Unlocking.
- Download the Magisk Manager APK file. This will provide the necessary functionalities to root your device. Don’t install it now as your device is about to go a full reset (by unlocking the bootloader). Install it after the said process is complete.
Unlock Bootloader of Sony Xperia 1 II
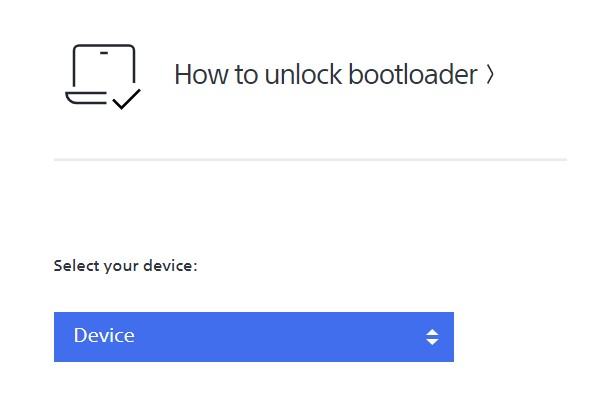
- Head over to the Sony Unlocking site and select your device from the list.
- Open the dialer on your device and type in *#*#7378423#*#*. This will take you to the Service Menu.
- Now head over to Service info > Configuration > Rooting Status. If it says Yes, then move over to the next step.
- Type in *#06#, copy the IMEI number and paste it in the provided space on the website.
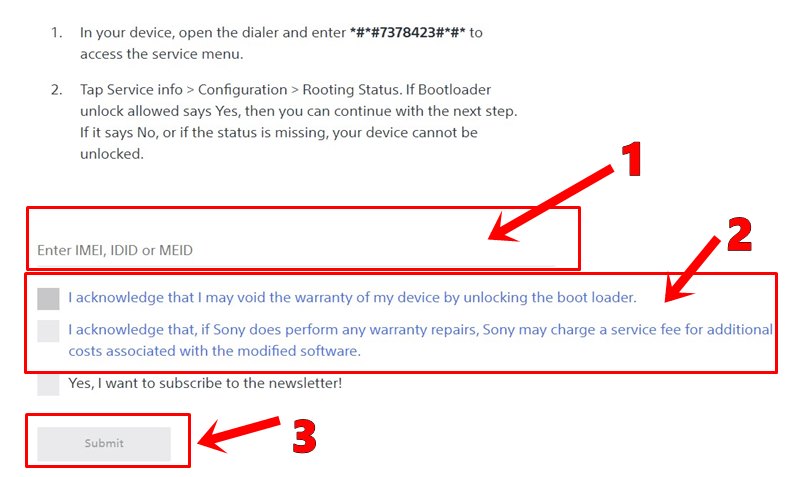
- Then checkmark both the acknowledgments and hit the Submit button. You will then get an Unlock Code, copy it, and keep it in a safe place.
- Now connect your device to PC via USB cable. Make sure USB Debugging is enabled.
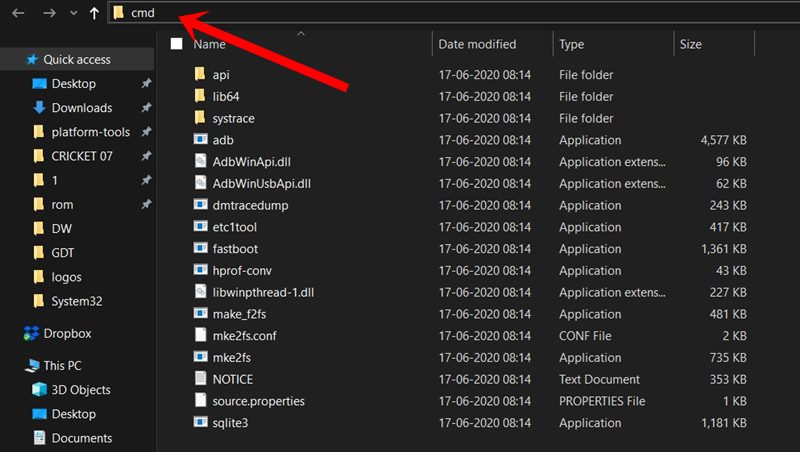
- Head over to the platform-tools folder, type in CMD in the address bar, and hit Enter. This will launch the Command Prompt.
- Type in the below command in that CMD window to boot your device to fastboot mode:
adb reboot bootloader
- You could also boot to Fastboot by powering off your device, then press the Volume Up button, and connect it to the PC via USB cable.
- Moving on, execute the following command to unlock the bootloader on your Xperia device. Replace the <unlock code> with the code that you had got from Sony in STEP 5.
fastboot oem unlock 0x<unlock code>
- The unlocking process will now begin and once that is done, your device should reboot. If not, you could do so via the following command as well:
fastboot reboot
- Set up the device by logging in to your Google Account. With this, you have unlocked the bootloader on Sony Xperia 1 II, its now time to root it via Magisk. Follow along for the instructions.
Root Sony Xperia 1 II
Since TWRP isn’t available for your device, we will first patch the stock boot.img file via Magisk. Then this patched file will be flashed via the Fastboot commands. All these instructions are given below under separate sections for ease of understanding.
STEP 1: Extract Stock Boot File from Firmware
To get hold of the stock boot file, you will first have to download the stock firmware file. Here is how it could be done:
- Launch the XperiFirm software on your PC.
- Select your device from the left side menu bar.
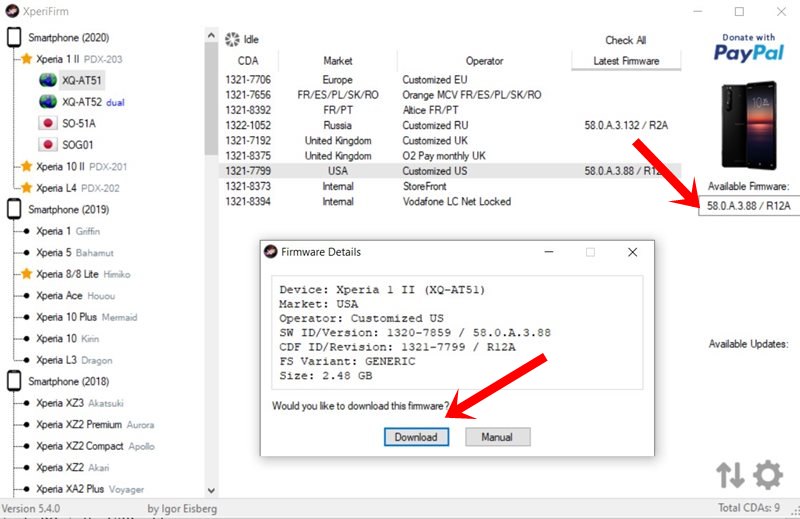
- Then select the firmware region and you should see the corresponding firmware file under the Available Firmware section.
- Click on the firmware version and you should then see the popup dialog box will appear, click on Download.
- Once the firmware has been downloaded, extract it and get hold of the stock boot_XXXXX.sin file.
STEP 2: Patch Stock Boot File via Magisk
- Install the Magisk Manager app on to your device. Since you are sideloading it, you will have to allow installation from Unknown Sources.
- Then transfer the boot_XXXXX.sin file to your device.
- Launch the Magisk app and tap on Install next to the Magisk Status.
- Under the Install Magisk dialog box, tap on Install.
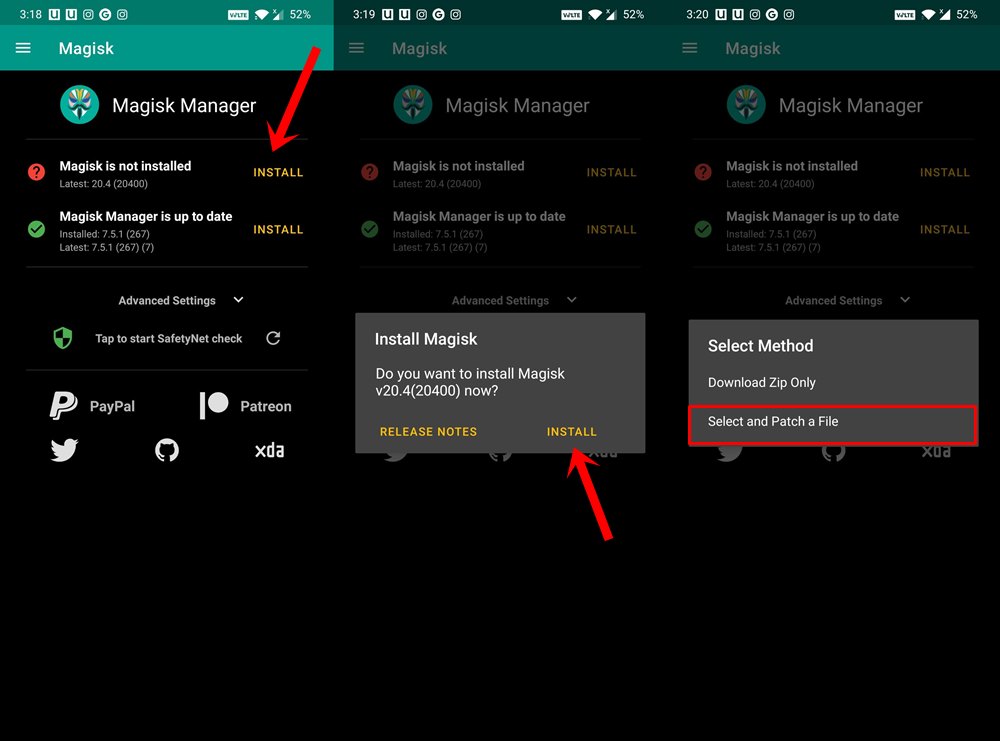
- In the Select Method option, tap on Select and Patch a File.
- Navigate to the boot_XXXXX.sin file and select it.
- Magisk will then begin patching the file. Once that is done, you should see the patched boot file placed under the Downloads folder on your device.
STEP 3: Flash Patched Boot File via Fastboot
- Transfer the patched boot file to the platform-tools folder on your PC. It is recommended to rename it to boot, hence the complete file name will then be boot.img.
- Now connect your device to PC via USB cable. You will have to enable USB Debugging as well.
- Inside the platform-tools folder, type in CMD in the address bar and hit Enter. This will launch the Command Prompt window.
- Execute the below command to boot your device to Fastboot mode:
adb reboot bootloader
- You will now have to flash the patched boot image file. Make sure that the file has been renamed to boot.img and placed inside the platform-tools folder. Now type in the following command to flash this file:
fastboot flash boot boot.img
- Once that is done, you could now reboot your device to the OS, using the following command:
fastboot reboot
With this, we conclude the guide on how to unlock the bootloader on Sony Xperia 1 II and then root it via Magisk. If you have any doubts regarding the aforementioned steps, do let us know in the comments section below. Rounding off, here are some iPhone Tips and Tricks, PC tips and tricks, and Android Tips and Trick that you should check out as well.
Discussion
1 Commenttolong tutorial Root sony xperia 1 mark V