Visual Concepts and 2K Games have announced a new basketball simulation video game called NBA 2K24, allowing players to experience an immersive sports co-op. After the launch, several players are experiencing NBA 2K24 crashing issues on Windows startup, which frustrates new title users.
If you’re experiencing issues with startup crashes or your game not launching on your Windows computer, you’re not alone. There are several reasons why this may occur, but don’t worry! With the help of this troubleshooting guide, you can resolve the problem and get back to gaming. In this guide, we’ll discuss some common causes of crashing and provide step-by-step instructions on resolving the issue. So, let’s get started and fix this problem once and for all!
Also Read
Page Contents
- Fix: NBA 2K24 Keeps Crashing on Startup on the PC
- 1. Check System Requirements
- 2. Run the game as an admin
- 3. Disable fullscreen optimizations
- 4. Update GPU Driver
- 5. Update Windows
- 6. Force Use the Dedicated GPU
- 7. Close Unnecessary Background Tasks
- 8. Repair Game Files
- 9. Update NBA 2K24
- 10. Turn Off Third-Party Overlay Apps
- 11. Turn Off Windows Firewall and Antivirus Software
- 12. Adjust Power Management Options
- 13. Reinstall Microsoft Visual C++ Runtime
- 14. Perform a Clean Boot
- 15. Restore Default to Overclocked CPU or GPU
Fix: NBA 2K24 Keeps Crashing on Startup on the PC
It’s important to note that following the complete troubleshooting guide can resolve startup crashing issues on the PC. Perform all steps consistently, since even common workarounds can help.
1. Check System Requirements
Before attempting to play a game on your PC, it’s important to check if your PC meets the game’s system requirements. You can move on to the next step if your PC meets the requirements. However, you must upgrade the necessary software or hardware if there’s an issue with your PC’s specifications.
Minimum Requirements:
- Requires a 64-bit processor and operating system
- OS: Windows 10 64-bit or Windows 11 64-bit
- Processor: Intel® Core™ i3-2100 @ 3.10 GHz/ AMD FX-6200 @ 3.80 GHz or better
- Memory: 6 GB RAM
- Graphics: NVIDIA® GeForce® GT 450 1GB/ ATI® Radeon™ HD 7770 1 GB or better
- DirectX: Version 11
- Network: Broadband Internet connection
- Storage: 150 GB available space
- Sound Card: Directx 9.0x
Recommended Requirements:
- Requires a 64-bit processor and operating system
- OS: Windows 10 64-bit or Windows 11 64-bit
- Processor: Intel® Core™ i5-4430 @ 3 GHz/ AMD FX-8370 @ 3.4 GHz or better
- Memory: 8 GB RAM
- Graphics: NVIDIA® GeForce® GTX 770 2GB/ ATI® Radeon™ R9 270 2GB or better
- DirectX: Version 11
- Network: Broadband Internet connection
- Storage: 150 GB available space
- Sound Card: Directx 9.0c
2. Run the game as an admin
To run a game app file on your PC, you need to have administrator access. This allows the User Account Control (UAC) to access the system. Sometimes, your system requires UAC access permission to run an important program. To allow admin access, follow the steps below. Once you follow these steps, you won’t be asked to grant the same permission again.
- Go to the installed NBA 2K24 game directory.
- Right-click on the application file on your PC.
- Click on Properties > Click on the Compatibility tab.
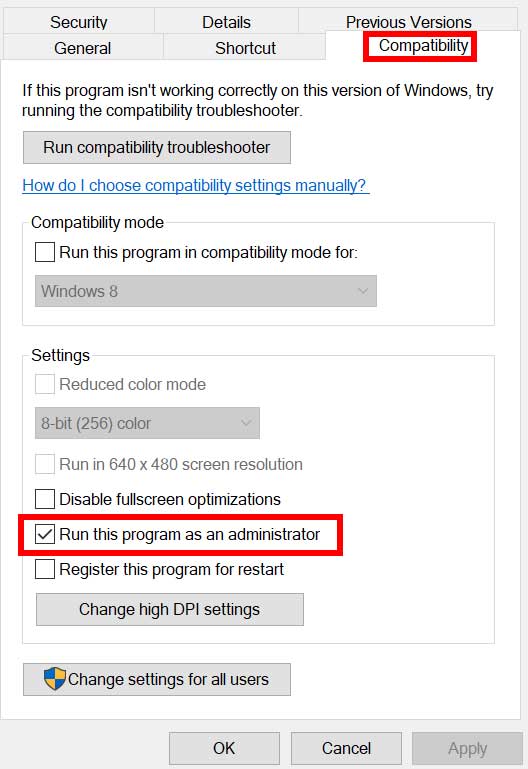
- Click on the Run this program as an administrator checkbox to enable it.
- Once done, click on Apply and then OK to save changes.
- Finally, double-click on the game app file to launch it.
If, in case, you’re running the game via the Steam Launcher, perform the same steps for the Steam application too.
3. Disable fullscreen optimizations
If you are experiencing compatibility issues with your game application on some PCs, it might help to turn off the fullscreen optimizations by the Windows system for that specific file. Even though it is disabled by default, it’s a good idea to verify that the fullscreen optimization is not enabled. To do this, follow the steps below:
- Open the Steam client > Click on Library.
- Right-click on NBA 2K24 > Click on Manage.
- Click on Browse local files > Head over to the NBA 2K24 installed folder.
- Right-click on NBA2K23.exe > Click on Properties.
- Go to the Compatibility tab > Ensure to click on Disable fullscreen optimizations to checkmark it.
- Once done, click on Apply and then OK to save changes.
- It might fix the NBA 2K24 Crashing issue on your PC.
4. Update GPU Driver
It’s important to update the graphics driver version on your PC to avoid issues with program launching, especially games, and gameplay sessions. An outdated GPU driver could cause graphics conflicts and prevent your PC from running at its full potential. Follow the steps below to update the driver:
- Press the Win+X keys to open the Quick Access Menu.
- Click on Device Manager from the list.
- Double-click on Display adapters to expand it.
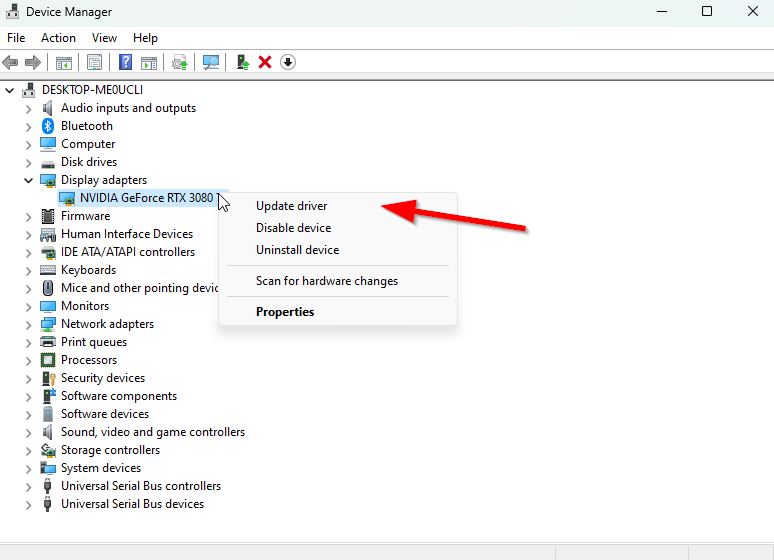
- Right-click on the dedicated graphics card that’s active, or you’re using.
- Now, click on Update driver > Click on Search automatically for drivers.
- It’ll now automatically check for the available update, then download and install the latest version.
- Just wait for the same and reboot the PC to apply changes.
In case your GPU does not have any available updates, you can manually search for the model of your graphics on the official website of the graphics card manufacturer from the links provided below. Remember to download and install the latest GPU driver that matches your model number in accordance with the manufacturer’s instructions.
5. Update Windows
It is important to regularly check if you are running an outdated version or build number of Windows. To do so, follow the steps below. It is highly recommended to always install the latest system update to get the latest security patches, improved performance, bug fixes, additional features, and more.
- Press the Windows + I keys to open Settings.
- Click on Windows Update and click on Check for updates.
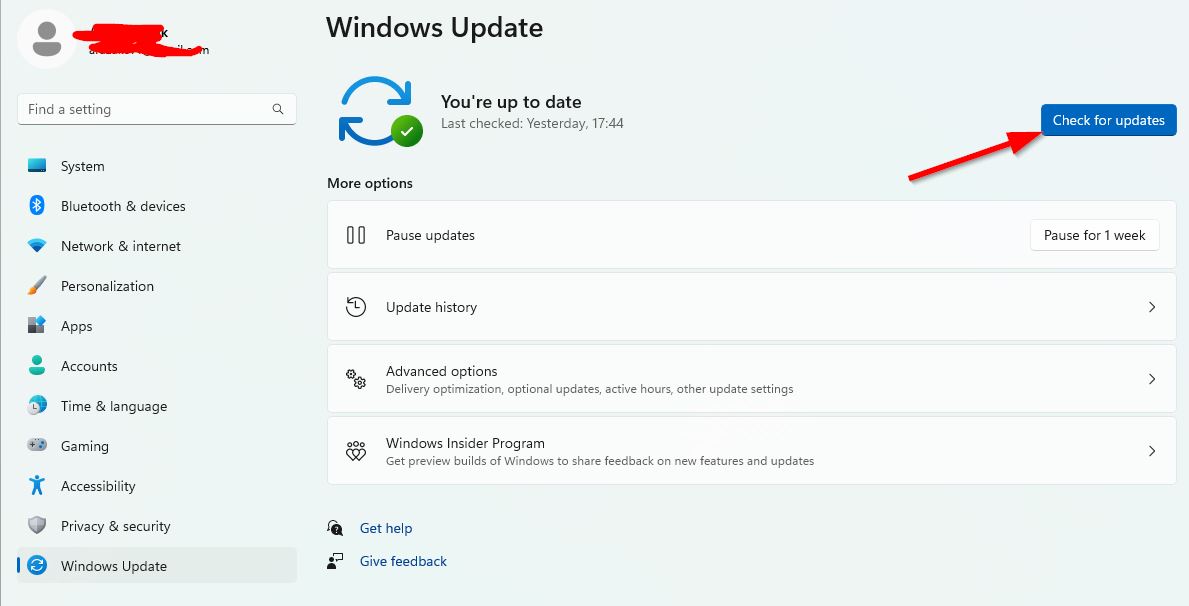
- If there is an update available, click on Download and Install.
- Wait for the update process to be completed.
- Once done, reboot your PC to apply changes.
You should also check for the optional updates by following the steps below. Sometimes, some driver or security patch updates might appear here to help you fix several bugs or issues.
- Press the Windows + I keys to open Settings.
- Click on Windows Update > Click on Advanced Options.
- Scroll down to locate Additional options.
- Click on Optional updates > If an update is available, you can select the update.
- Now, click Download & Install, then wait some time to complete it.
- Finally, reboot the system manually.
6. Force Use the Dedicated GPU
For Nvidia GPU:
- Right-click on the blank desktop screen > Open Nvidia Control Panel.
- Go to 3D Settings > Click on Manage 3D Settings.
- Open Program Settings > Select NBA 2K24 from the list.
- Select preferred graphics processor for this program from the list.
- Once done, you can see it as High-Performance Nvidia Processor.
- Make sure to save changes and reboot the PC.
For AMD GPU:
- Right-click on the blank desktop screen > Open Radeon Settings.
- Head over to Additional Settings > Go to Preferences.
- Click on Power > Click on Switchable Graphics Application Settings.
- Select NBA 2K24 from the list. [If the game is not visible, select Add Application to include the game]
- Once done, select High Performance from Graphics Settings.
- Finally, reboot the PC to apply changes.
7. Close Unnecessary Background Tasks
To improve your system’s performance, it is advisable to close all unnecessary background tasks that are running. This is because the more system resources that are used, the lower your system’s performance will be. While you may not notice a significant drop in performance when playing games, you may experience issues such as lags, framerate drops, and stutters. Following these steps will help you optimize your system’s performance and avoid such issues.
- Press the Ctrl + Shift + Esc keys to open Task Manager.
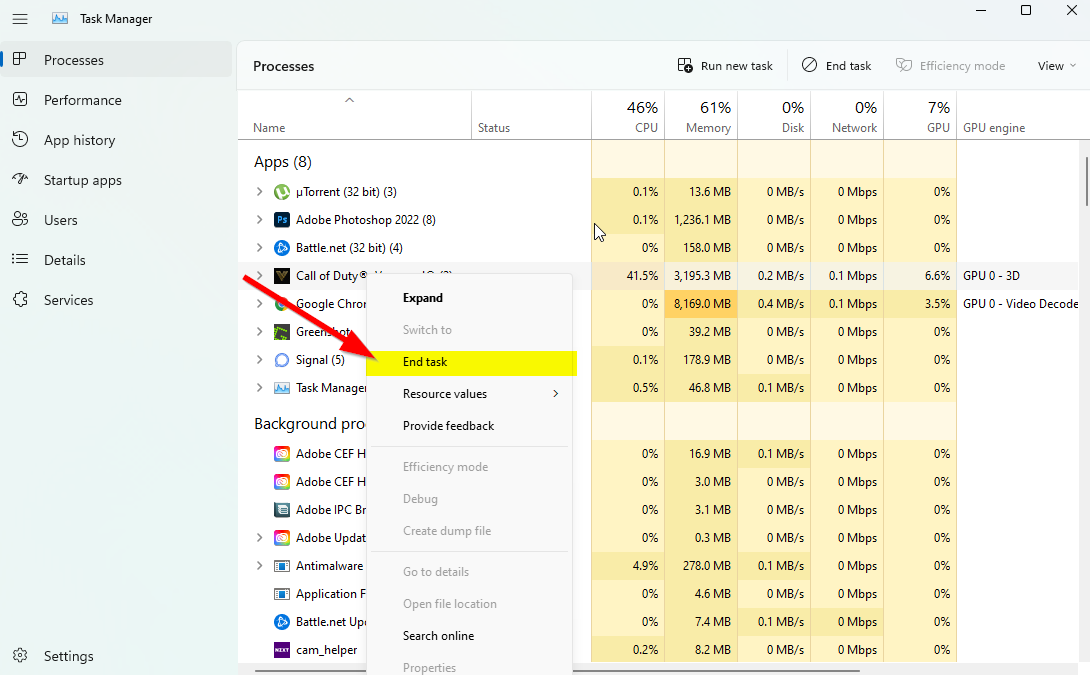
- Click on Processes and check which task is consuming higher resources.
- Just click on the particular process and select End Task to close it forcefully.
- Make sure to do the same steps for each third-party app process that is consuming higher resources.
- Once done, close Task Manager, and restart your PC.
8. Repair Game Files
Encountering game launching crashes due to corrupted or missing game files on your PC can be frustrating, especially when there are no proper error messages. If your game starts to load for a few seconds and then closes automatically, or doesn’t launch at all, it’s best to verify and repair the installed game files on your PC. Follow the steps below to do this:
- Launch the Steam client > Click on Library.
- Right-click on NBA 2K24 from the list.
- Click on Properties > Go to Local Files.
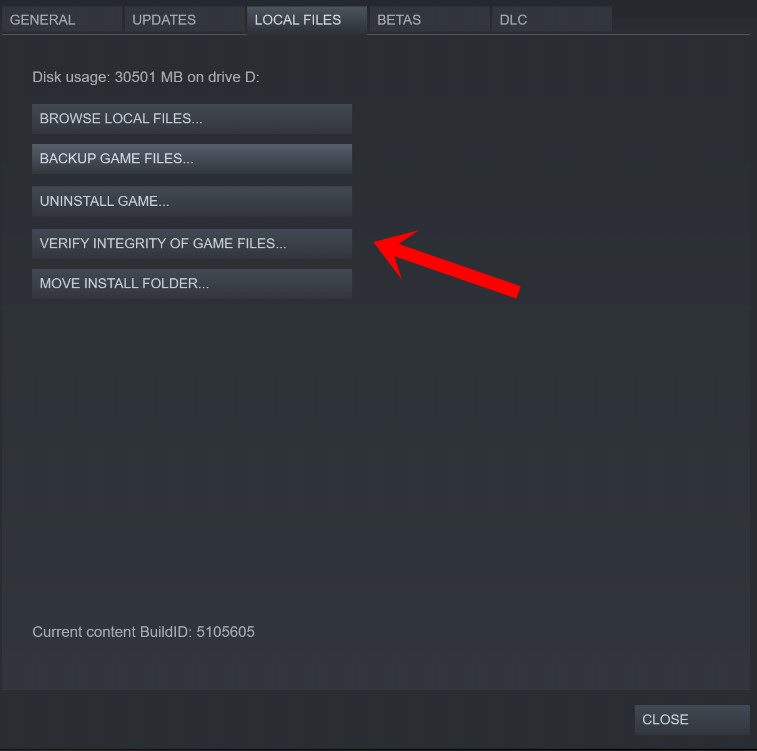
- Click on Verify Integrity of Game Files.
- This process may take some time to get completed. So, have some patience.
- Once done, make sure to reboot the PC to apply changes.
- This method mostly resolves the NBA 2K24 Crashing issue.
9. Update NBA 2K24
It is recommended that you manually check for game updates via the Steam client to ensure that there is no outdated game version causing any conflicts with launching the game. An outdated game patch version can trigger several potential issues that may result in crashes. To do this, please follow these steps:
- Open Steam and go to Library.
- Click on NBA 2K24 from the left pane > Steam will automatically search for the available update.
- If there is an update available, click on Update.
- Make sure to wait for some time until the update completes.
- Once done, ensure to reboot the PC to apply changes.
10. Turn Off Third-Party Overlay Apps
If you’re experiencing problems launching a game, it could be due to conflicts with third-party overlay apps running in the background. These apps consume a lot of system resources, much like the game processes themselves. Even if the game fails to launch, the overlay app may still start and continue running until you manually close it. Additionally, some overlay apps may start running automatically when you boot up your system. To address these issues, try manually disabling any overlay apps that you have installed.
Disable Discord Overlay:
- Open the Discord app > Click on the gear icon (Settings) at the bottom.
- Select Overlay under App Settings > Turn on the Enable in-game overlay.
- Click on Games > Select NBA 2K24.
- Make sure to turn off the Enable in-game overlay toggle.
- Once done, reboot your PC to apply changes.
Disable Xbox Game Bar:
- Press the Windows + I keys to open Settings.
- Now, click on Gaming > Go to Game Bar.
- Turn Off the Record game clips, screenshots, and broadcast using the Game bar option.
- Once done, save changes, and reboot the PC to apply changes.
Disable Nvidia GeForce Experience Overlay:
- Launch the Nvidia GeForce Experience app > Go to Settings.
- Click on General > Disable the In-Game Overlay option.
- Once done, restart the PC to apply changes.
Disable Steam Overlay:
- Open the Steam client > Click on Library.
- Right-click on NBA 2K24 > Click on Properties.
- Click on General > Turn OFF the Enable the Steam Overlay while in-game option.
- Once done, reboot the PC to change the effects.
Many PC gamers and advanced users often use additional overlay applications like MSI Afterburner, Rivatuner, and RGB software. If you’re using any other mouse or keyboard software or any RGB tool that is not essential during gaming, it’s recommended to turn them off. This can help optimize your system’s performance and prevent any potential conflicts during gameplay.
11. Turn Off Windows Firewall and Antivirus Software
The chances are high that you’re using the default Windows Firewall protection on your PC but sometimes disabling it temporarily before launching any game might greatly reduce startup crashing issues. To do this:
- Click on the Start Menu > Type Windows Defender Firewall and open it.
- Next, click Turn Windows Defender Firewall on or off from the left pane.
- Select the Turn off Windows Defender Firewall (not recommended) option for all domains.
- Once done, click OK to save changes > Reboot your PC to apply changes.
Additionally, turn off the Windows Defender antivirus program on your PC to ensure no antivirus software is blocking the game files. To do so:
- Press the Windows + I keys to open Settings.
- Click on Update & Security > Click on Windows Security.
- Click on Open Windows Security > Go to Virus & Threat Protection.
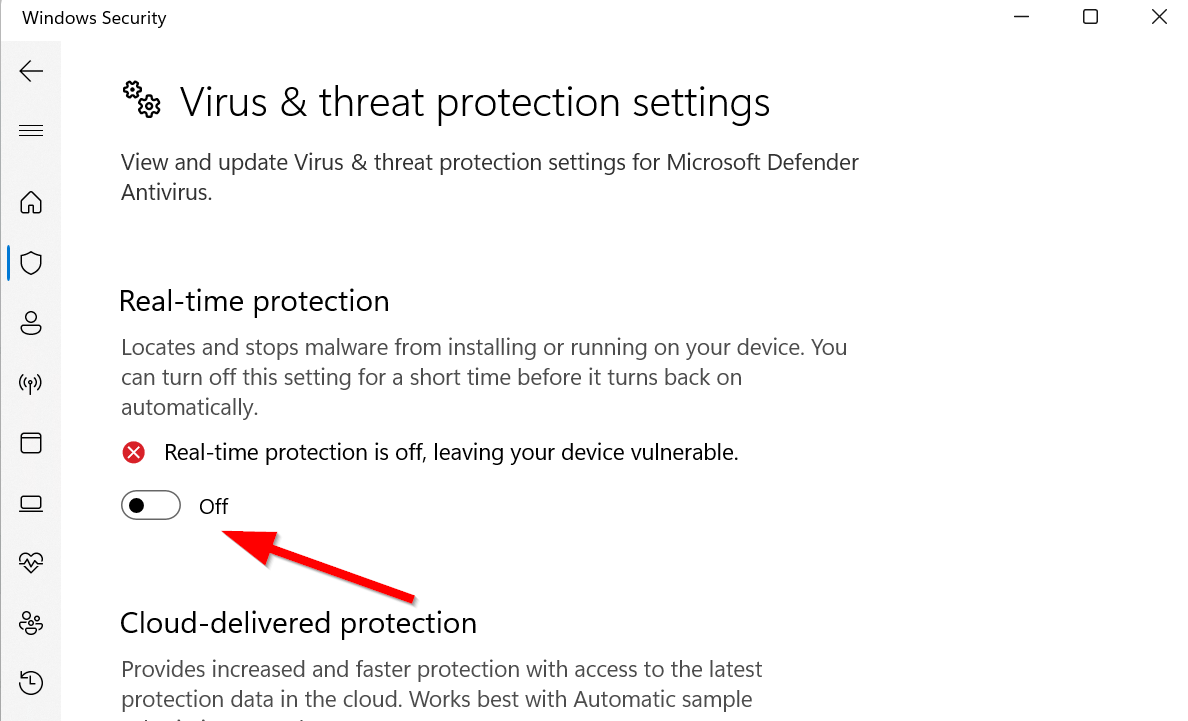
- Now, click on Manage settings > turn off the Real-time protection toggle.
- If prompted, click on Yes to proceed further.
Note: If you’re using any other third-party antivirus program on your PC, turn it off from its settings menu.
12. Adjust Power Management Options
It’s better to set the high-performance power option on your computer before playing games to get the system’s full potential because Windows prefers to run in the default balanced power mode to save power and offer medium performance for your daily tasks. But the heavy games or applications require high-performance mode, which will consume extra power but offers stunning performance. To do that:
- Click on the Start Menu > Type control panel and open it.
- Click on Hardware and Sound > Select Power Options.
- Select High Performance, and you’re done.
- Finally, reboot the PC to apply changes.
13. Reinstall Microsoft Visual C++ Runtime
If your Windows system doesn’t have Microsoft Visual C++ Redistributables installed or even already installed, make sure to reinstall it manually by following the steps below.
- Open the Start Menu > Type apps & features and open it.
- Click on the Microsoft Visual C++ program(s) from the list one by one.
- Click on Uninstall and follow the on-screen instructions.
- Once all Visual C++ programs are uninstalled, reboot the PC.
- Now, go to the official Microsoft website and download the latest Microsoft Visual C++ Runtime.
- Make sure to install it on your computer and restart the system to change the effects.
14. Perform a Clean Boot
Multiple users claimed that performing a clean boot on the PC did fix the system boot-up issue because some apps or tasks start at the very beginning. These tasks run all the time and consume a lot of system resources. You should follow the steps below to do so:
- Press the Windows + R keys to open the Run dialog box.
- Type msconfig and hit Enter to open System Configuration.
- Go to Services > Click on Hide all Microsoft services to enable it.
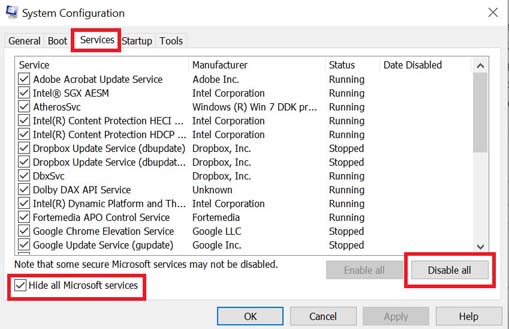
- Now, click on Disable all so that rest of the services gets turned off.
- Click on Apply and then OK to save changes.
- Next, go to Startup > Click on Open Task Manager.
- Click on the Startup tab > Ensure to select the specific task that has a higher startup impact.
- Now, click on Disable to turn it off.
Note: Do the same steps for each program that has a higher startup impact except for the audio or graphics service.
- Finally, make sure to restart your computer to apply changes.
15. Restore Default to Overclocked CPU or GPU
Sometimes, when a CPU or GPU is overclocked on a PC, it can cause conflicts with other hardware and result in a bottleneck issue. To identify the potential cause behind the crashing issue, it’s recommended to temporarily disable or restore the overclocked CPU/GPU to the factory default. There are several online tools available to adjust overclocked CPU or GPU on a PC, such as MSI Afterburner, Riva Tuner, AMD Ryzen Master, EVGA Precision X, and more.
That’s it, guys. We assume this guide was helpful to you. For further queries, you can comment below.