Java Virtual Machine (JVM) is a powerful application that allows Java apps to run on any computer whether it is Windows or Mac. You might have heard about Java, but what is it? Java is a versatile language apart from programming that is mainly used to write various apps. Unlike other applications, you can easily run Java apps on Windows, Mac, or Linux. However, it can be heartbreaking when you cannot open the Java Virtual Machine launcher on your Windows PC.
Many programmers or users encountered an issue with Java, where they noticed that the Java Virtual Machine launcher was getting an error code when launching it. Generally, the error indicates “Could not create the Java Virtual Machine” message. If you have the same error when launching the Java Virtual Machine, this guide is for you. In this article, we’ll go through the most effective methods you can attempt to fix the Java Virtual Machine launcher error on your windows computer. Let’s get right to it.
Page Contents
- Reasons Why Java Virtual Machine Launcher Showing Error?
- Ways to Fix Java Virtual Machine Launcher Error
- Wrapping Up
Reasons Why Java Virtual Machine Launcher Showing Error?
When accessing the Java Virtual Machine launcher on your Windows computer and it shows an error instead, it could be due to many reasons. The most common reason is the Java Installation issue. This usually happens when a Java Virtual Machine is not installed properly on Windows. In some cases, the Java Virtual Machine launcher shows error due to outdated Java launcher, corrupted Java, insufficient storage space, and conflicting software’s.
Java Virtual Machine launcher shows error on Windows PC, if the default app has not been set to Java Virtual Machine launcher and if the application needs administrative rights to run. These were the most common reasons behind the Java error on Windows.
Ways to Fix Java Virtual Machine Launcher Error
If you are not able to access Java Virtual Machine launcher on your Windows 10 or Windows 11 then you’re in the right place. Here, we have listed the effective methods you can check out to address the error on Java Virtual Machine launcher. By reading and applying the methods, you will be back to run Java Virtual Machine launcher again.
1. Run Java as an Administrator
If you are unable to access the Java Virtual Machine launcher on a Windows computer, it could be due to insufficient user privilege. To avoid the error, you should run the Java program as an administrator which allows you to run the program with administrator privileges.
To run Java as an administrator, follow the steps below:
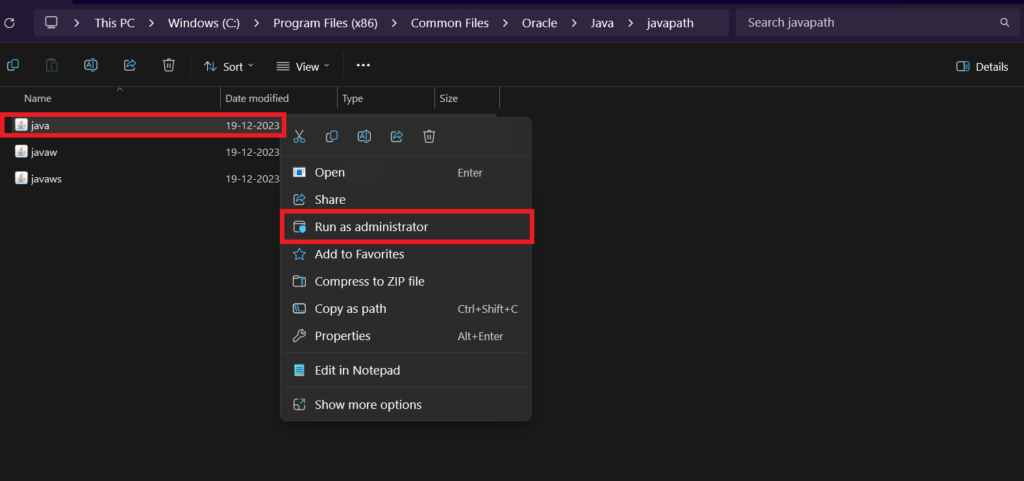
- Press Windows + E key together on the keyboard to open File Explorer.
- Navigate to the Java Installation folder. (The file is usually located at “Windows (C:) > Program Files (×86) > Common Files > Oracle > Java > Javapath.”)
- Once you locate the Java file then right-click on it and select “Run as administrator.”
- Under the User Account Control (UAC) menu, click Yes to proceed further.
2. Verify Java Installation
Another thing you have to do is verify Java Installation on your Windows laptop or PC. It is most important to install the right Java Runtime Environment (JRE) or Java Development Kit (JDK) tool. However, you may address the “Could Not Create the Java Virtual Machine” error on Windows computer if you’ve installed an incorrect program.
Make sure to check the necessary components and verify the installation of the Java program and other tools. Plus, ensure to check the system PATH environment variable to endorse that it includes the right Java directory. To check the Java Installation whether it is correctly placed or not, follow the steps below:
- Click on the Windows Key on the keyboard to launch Start Menu.
- In the Windows search bar, type in “Command Prompt” and select Run as administrator.
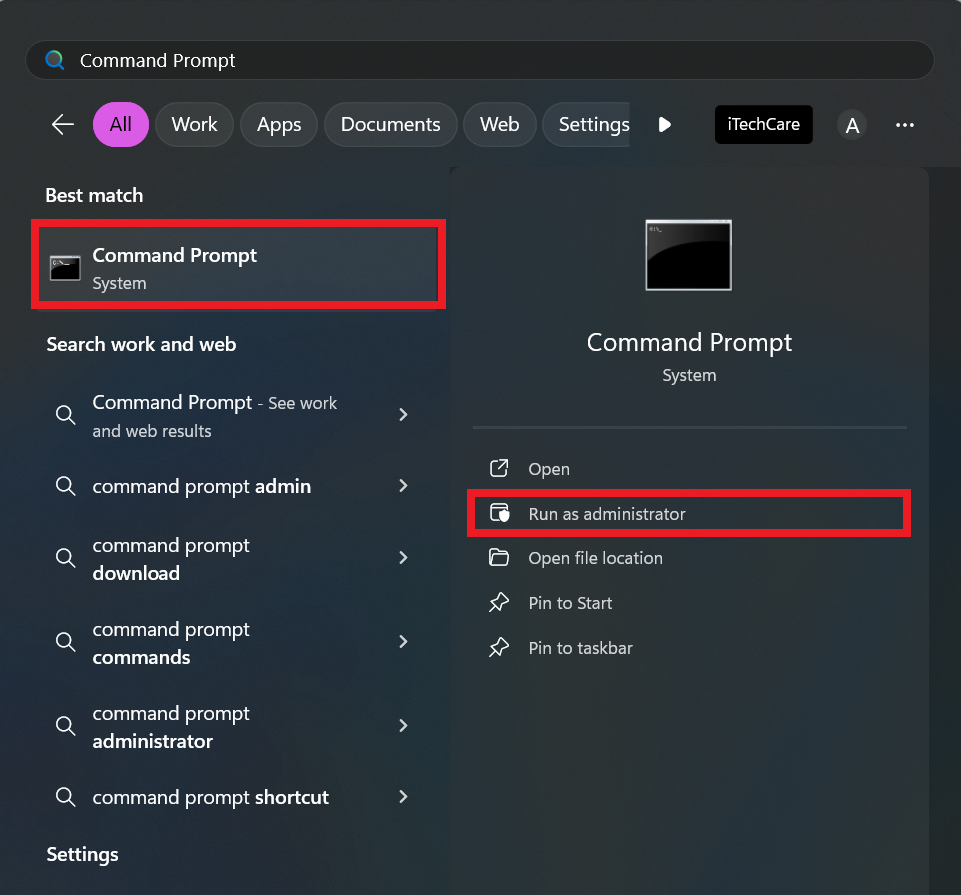
3. Under the User Account Control (UAC) menu, click Yes to proceed.
4. Next, type the below command and then click Enter to run it.
java --version
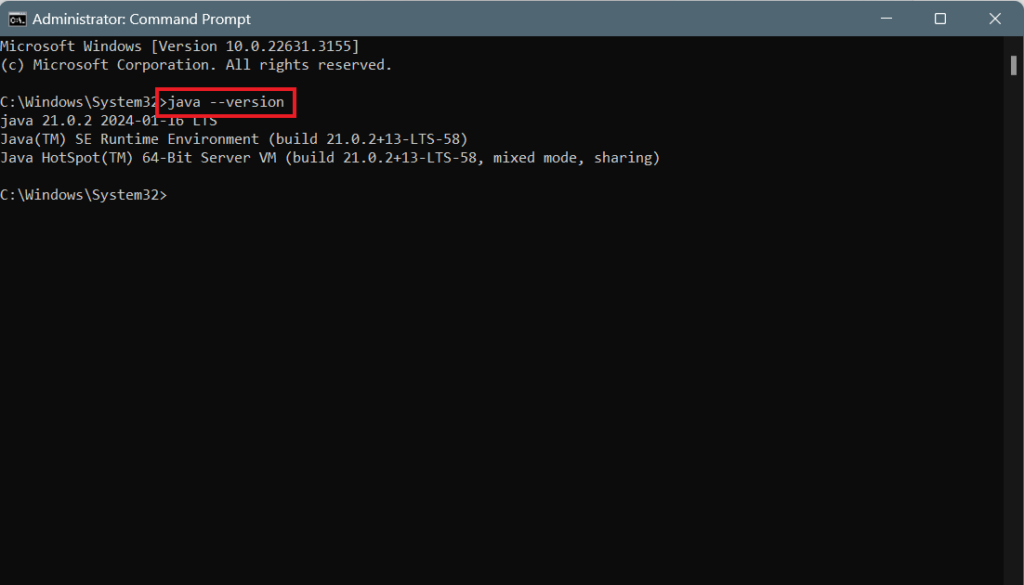
After entering the command, you will see the message on the screen. If you see “Could Not Create the Java Virtual Machine” error, then it means that Java Installation is incorrect. On the other hand, if you see the details about the Java version and its path, it means you’ve installed the correct Java and other programs.
3. Increase System Memory for Java
At certain times, the Lava Virtual Machine launcher shows the error message due to the Java program lacking memory. Generally, the memory allocated to Java is called a Java heap. Luckily, you can solve the Java error message by increasing system memory for Java. Below we have outlined the two most effective steps to increase system memory for Java programs.
Method 1: Increase Java Heap Size by Modifying Variables
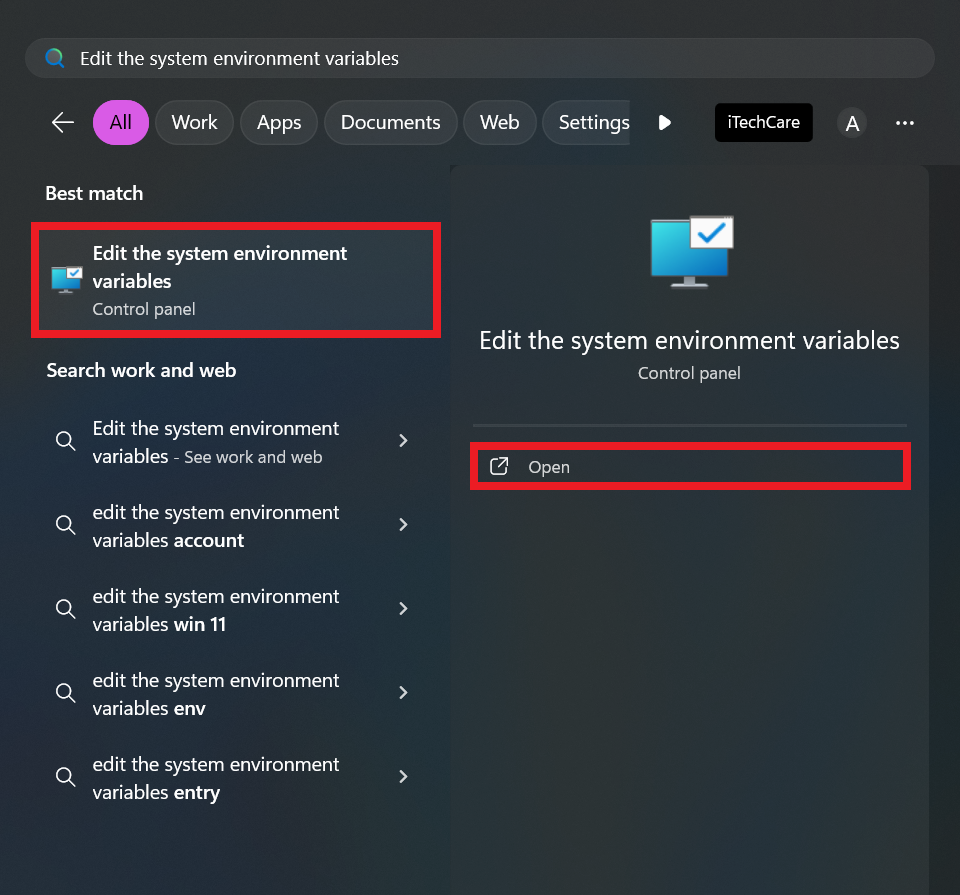
- Press the Windows key on the keyboard to launch Start Menu.
- In the Window search bar, type in “Edit the system environment variables” and click Open.
3. Under the Advanced section, click on “Environment Variables…”

4. Under the System variables menu, click on the New button.
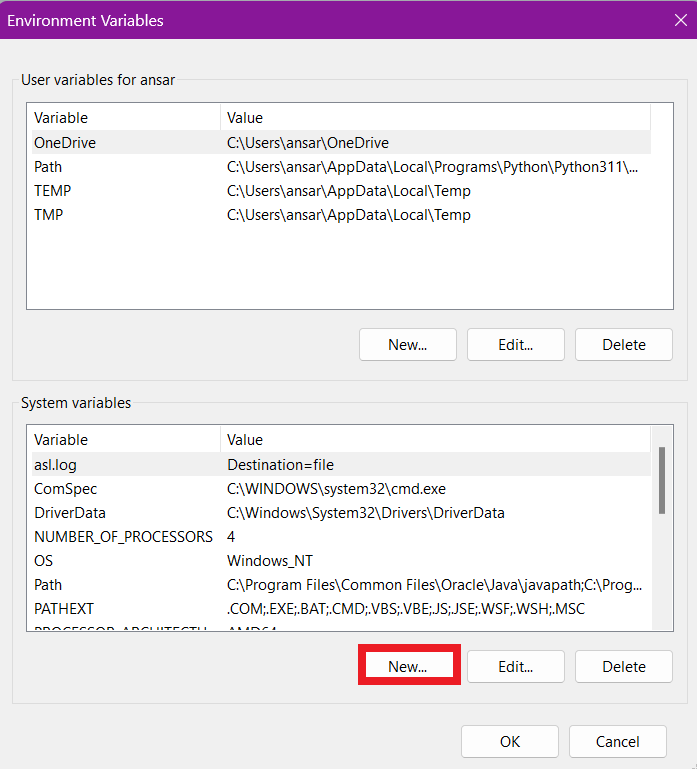
5. Enter the below following details in the boxes and then click OK.
- Variable name: -JAVA_OPTIONS
- Variable value: -Xmx512M
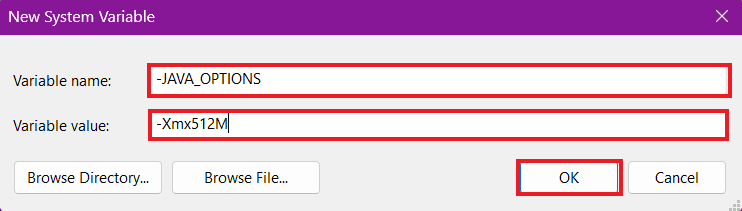
Note: The variable value -Xmx512M sets memory available to Java to 512 MB only. However, you can change the value when you need or depending upon the memory.
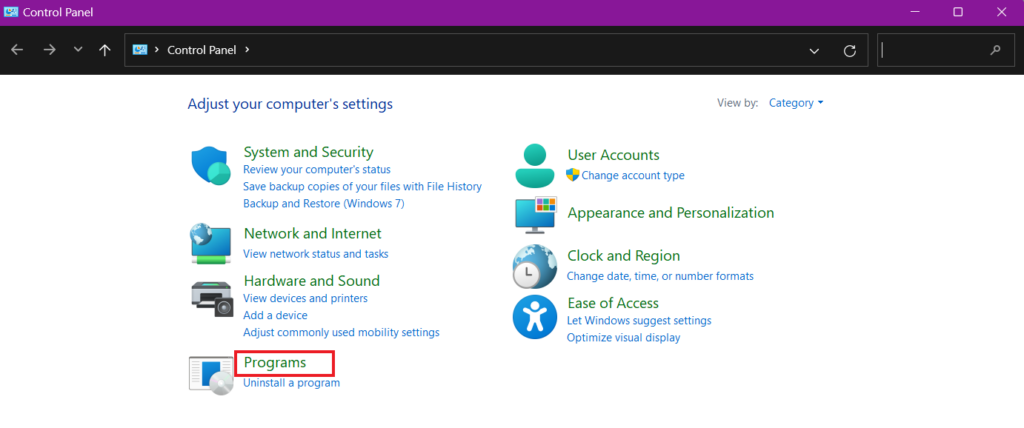
Method 2: Increase Java Heap Size Using Java Control Panel
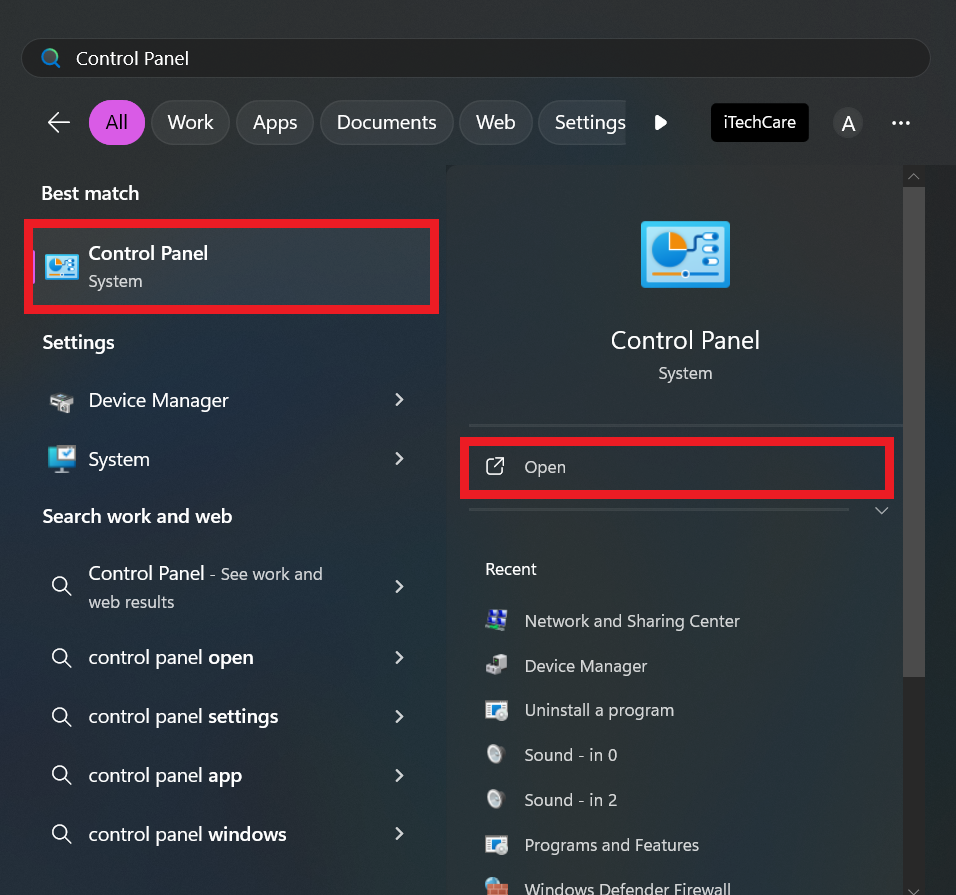
- Press the Windows key on the keyboard to launch Start Menu.
- In the Windows search bar, type in “Control Panel” and click Open.
3. Click on Programs.
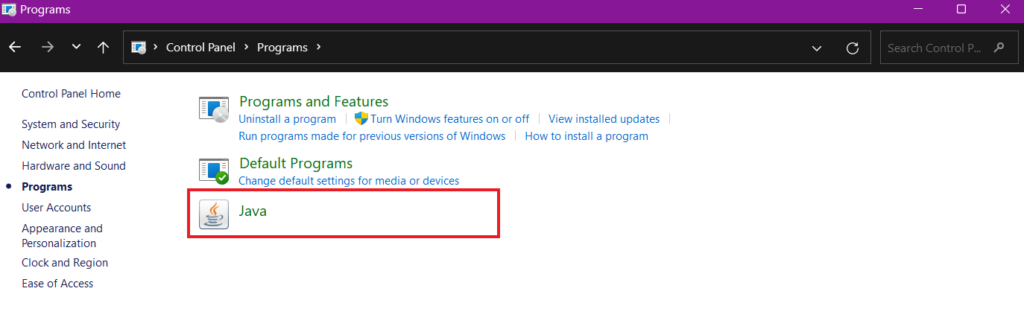
4. Under the Programs window, click Java from the options. (Now you’ll be directed to the Java Control Panel.)
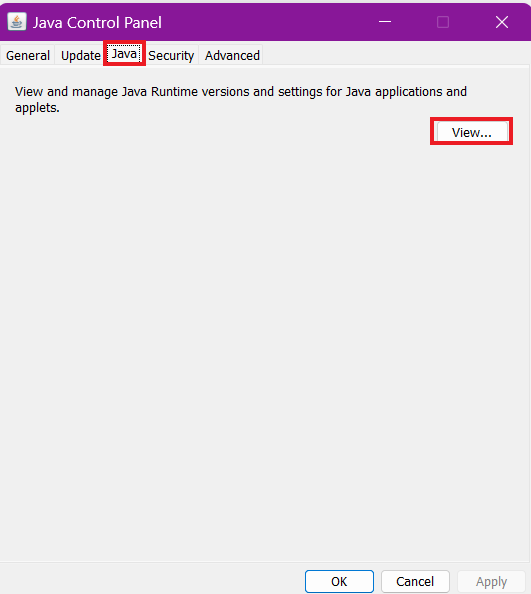
5. In the Java Control Panel, click the Java button at the top bar and then select the “View…” option.
6. Now, double-click on the “Runtime Parameters” column and type in “-Xmx512m” to assign 512MB Java memory.
7. Lastly, click on OK to save changes and then close the program.
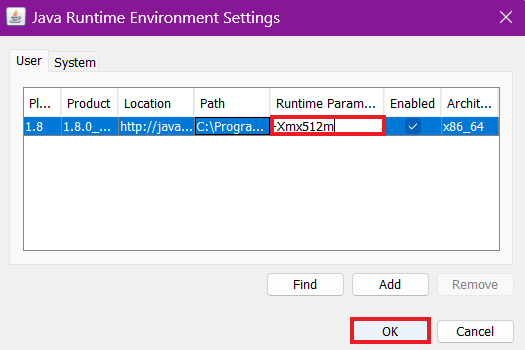
8. You have successfully increased the Java memory.
4. End Java Processes and Try Again
If you encounter error messages on Java Virtual Machine launcher then you should end Java task processes and then launch it back to check the results. It’s an effective way to address such errors on programs.
To end Java processes on a Windows PC, follow the steps below:
- Navigate to Windows search menu bar and type in “Task Manager” and then click Open.
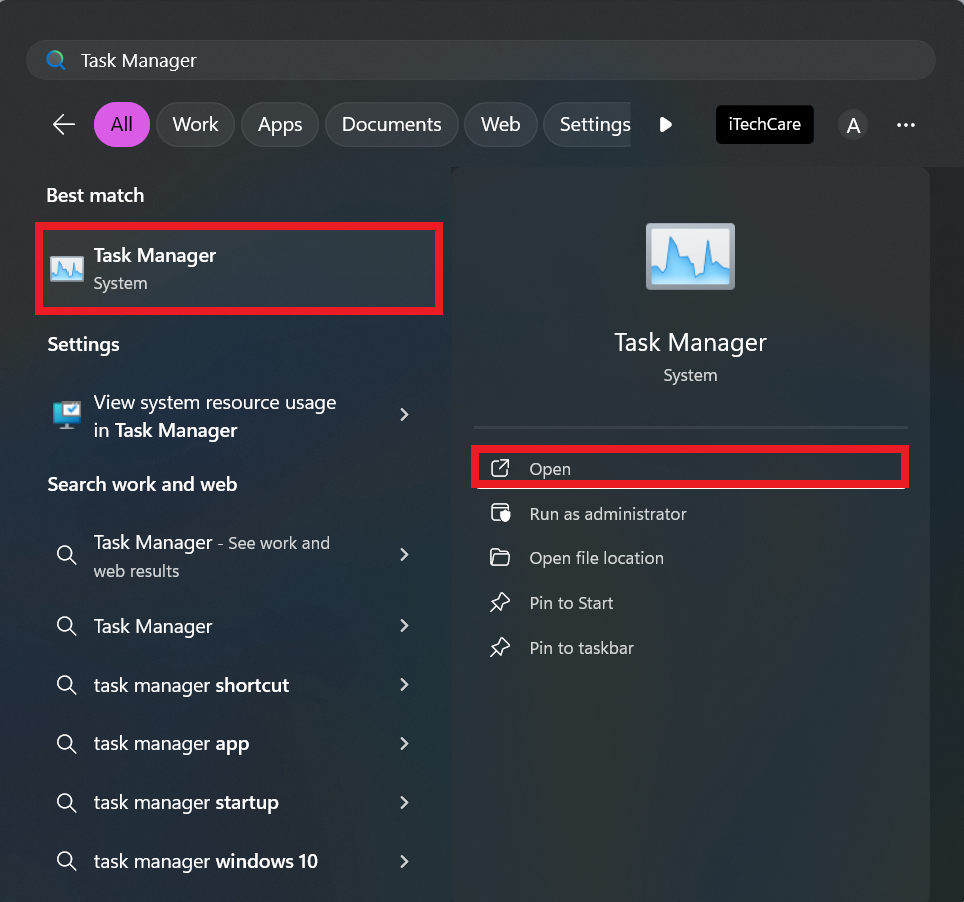
2. Click on the “Processes” tab located at the left-hand side.
3. Under the Background Processes, locate the Java program.
4. Once you find it, right-click on the Java program and click “End Task” to close the background activity.
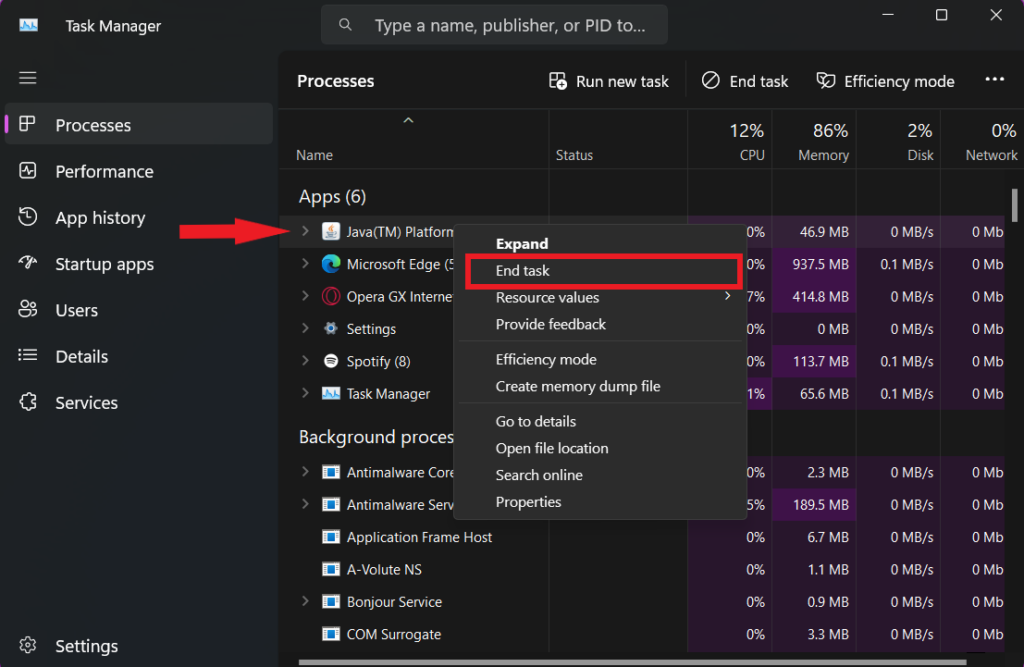
5. Follow this same procedure with other Java programs and terminate it.
6. Once done, launch the Java Virtual Machine launcher and check if the error has been fixed.
5. Disable Conflicting Programs
In most cases, the software programs and other applications don’t work as expected due to conflicting programs. If you’re trying to access the Java Virtual Machine launcher on a Windows PC and it’s showing an error instead, probably it could be due to conflicting apps or programs. In such a case, you should try disabling the conflicting programs. This will help you in fixing the Java Virtual Machine launcher error issue.
Therefore, disable the conflicting programs on your Windows PC or laptop and then it allows you to launch Java Virtual Machine launcher without any hurdles. In addition, you can end task processes at the same time that acts as a disabling process. Here’s how to do it.
- Navigate to Windows search menu bar and type in “Task Manager” and then click Open.
2. Click on the “Processes” tab located at the left-hand side.
3. Under the Background Processes, locate the conflicting programs or apps.
4. Then, right-click on the conflicting program and select “End Task” to close the background activity.
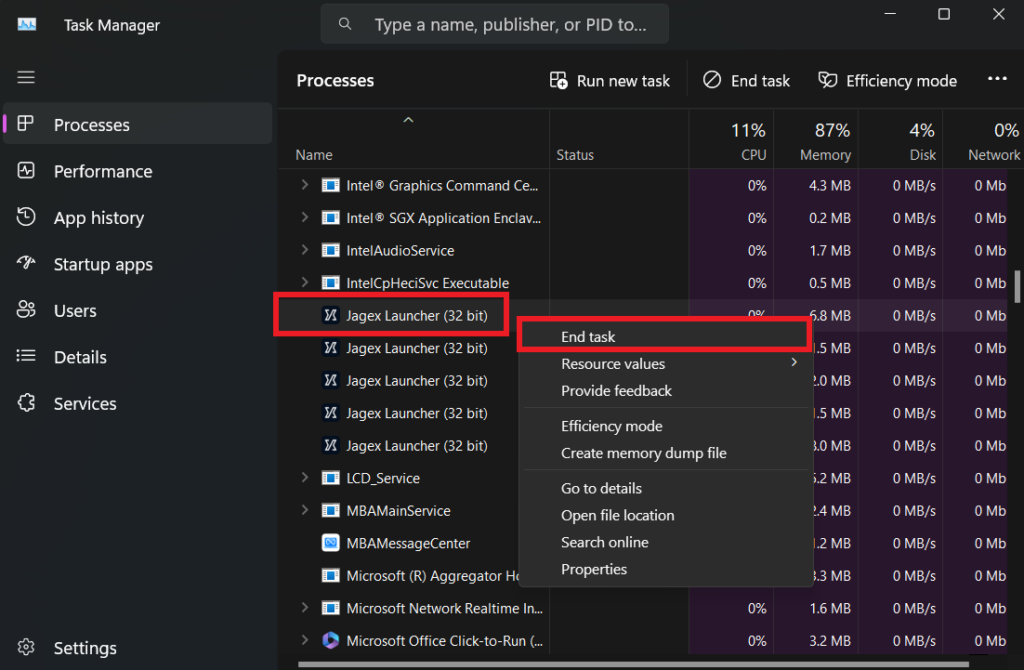
5. Once done, launch the Java Virtual Machine launcher and check if the error has been fixed.
6. Reinstall Java Virtual Machine
The Java Virtual Machine launcher error message shows due to various causes. But you fix the error message on the Java program by uninstalling and reinstalling it. It is an effective method that will completely give a fresh installation to the Java app.
By uninstalling and reinstalling Java, it can clear out the corrupted files, conflicting settings, and outdated configurations. Make sure to uninstall and reinstall the Java and then check the results. Here’s how to do it.
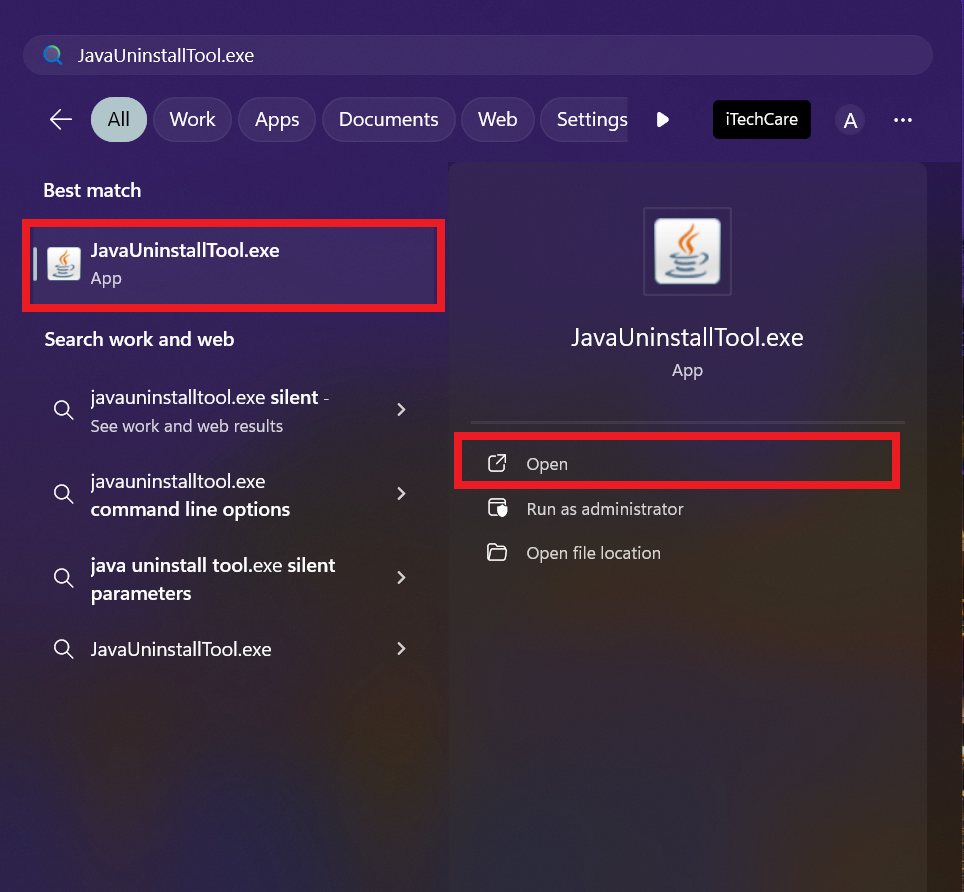
- Navigate to your web browser on your Windows computer.
- Head over to the Java Uninstall Tool page and then download and install the program.
- Once you downloaded the tool then press the Windows icon to get the Start Menu.
- In the search bar menu, type Java Uninstall Tool and click Open.
5. Under the User Account Control (UAC) menu, click Yes to proceed.
6. Click on the Agree button to start the uninstall process. When the prompt appears, click Yes.

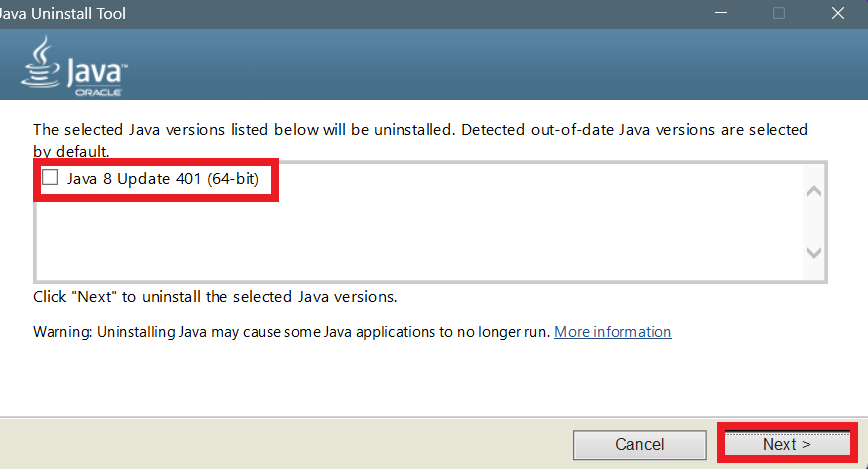
7. Check marks the Java version that shows on the screen you want to uninstall and click Next. Once the pop-up menu appears, click Yes.
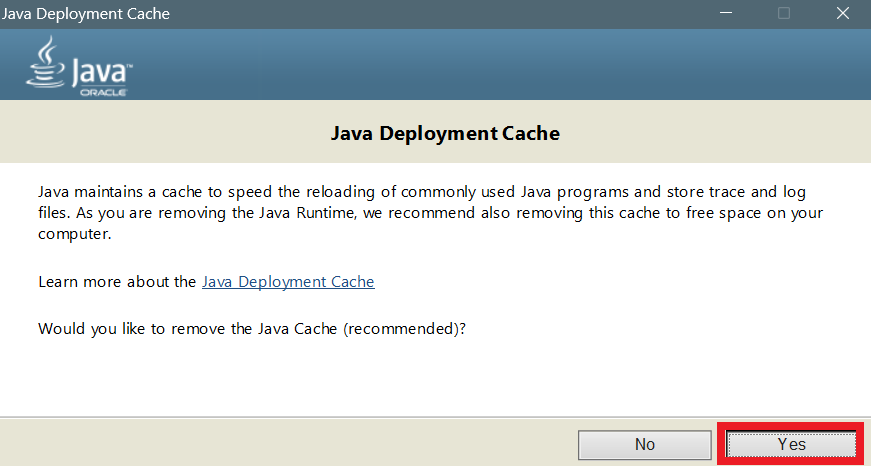
8. Now you will be asked to remove the Java Deployment Cache, press Yes to proceed.
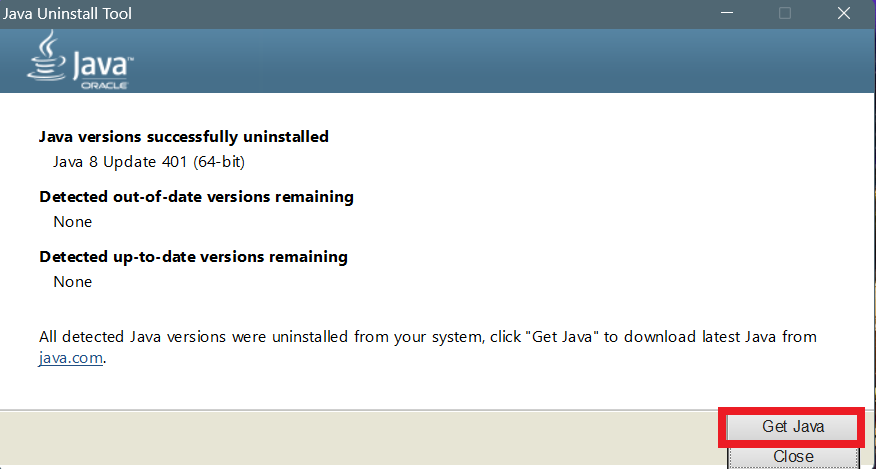
9. Now the JVM starts uninstalling from your PC. Once it finished, then click on Get Java button to reinstall the Java Virtual Machine launcher.
10. Download the Java Virtual Machine launcher on your computer.
11. Once the download finished, then double-click on the file and install it.
Wrapping Up
This brings us to the end of this tutorial on how to fix Java Virtual Machine launcher error on Windows. Java is a most popular language that allows you access Java and other programs, especially for developing a variety of different applications. However, it is common to encounter errors or issues on a specific program including Java Virtual Machine Launcher.
Thankfully, you may address the Java error easily by following the methods outlined in this guide. We have mentioned the various methods that will help you in fixing the Java Virtual Machine launcher error. I hope that this guide was helpful to you. If you’ve any queries then let us know in the comments section below. We will reach you out soon.