Alan Wake II is a survival horror game developed by Remedy Entertainment and published by Epic Games Publishing. A sequel to Alan Wake, the story follows best-selling thriller novelist Alan Wake, who has been trapped in an alternate dimension for 13 years, as he attempts to escape by writing a horror story involving an FBI agent named Saga Anderson.
Despite its anticipated arrival, the game hasn’t been without its share of technical hiccups. Despite their high-end setups, many PC gamers have reported challenges such as crashes, lags, stutters, and frame drops. Among the most prevalent issues is the game failing to launch or load Windows PCs.
Players eagerly awaited the full version of Alan Wake 2, and while it’s now available for PC, the launch hasn’t been smooth. A notable concern, especially among those using the Epic platform, is the game’s loading issue, as highlighted by various online forums.

Fix: Alan Wake 2 is Not Responding or Loading on the PC
Luckily, some possible workarounds are mentioned below to fix the easily won’t launch or not loading issue. So, without wasting any more time, let’s jump into it.
First of all, you should check whether your PC configuration is meeting the system requirements or not. If your PC hardware can’t run the game normally, you’ll face glitches, lags, frame drops, crashes, graphical issues, and more.
Minimum Requirements:
- Memory: 16 GB
- Graphics Card: NVIDIA GeForce RTX 2060 or Radeon RX 6600
- CPU: Intel Core i5-7600K
- File Size: 90 GB
- OS: Windows 10
Recommended Requirements:
- Memory: 16 GB
- Graphics Card: NVIDIA GeForce RTX 4070 or Radeon RX 6700 XT
- CPU: AMD Ryzen 7 3700X
- File Size: 90 GB
- OS: up to Windows 11
1. Run the Launcher as an Administrator
First, you should try running the game launcher as an administrator on Windows to allow the launcher program and the game files to run properly. Not running the game or client as an administrator, you may find it pretty difficult to avoid crashes or not launching issues that require UAC (User Account Control) access. Ensure to follow the steps below to do so:
To run the Epic Games Launcher as an Administrator, follow these steps:
- Locate the Epic Games Launcher executable file: Navigate to the folder where the Epic Games Launcher is installed on your computer. By default, it should be in
C:\Program Files (x86)\Epic Games\Launcher\Portal\Binaries\Win64. - Find the executable file: Within the Win64 folder, locate the Epic Games Launcher executable file named
EpicGamesLauncher.exe. - Run as Administrator: Right-click on the
EpicGamesLauncher.exefile and select ‘Run as administrator’ from the context menu. If prompted by User Account Control (UAC), click ‘Yes’ to grant the necessary permissions.
The Epic Games Launcher will now launch with administrator privileges. To make this a permanent setting:
- Open Properties: Right-click on the
EpicGamesLauncher.exefile and select ‘Properties’ from the context menu. - Compatibility tab: In the Properties window, click on the ‘Compatibility’ tab.
- Run as Administrator: Under the Settings section, check the box next to ‘Run this program as an administrator.’
- Apply changes: Click on the ‘Apply’ button and then on ‘OK’ to save your changes.
The Epic Games Launcher will always run as an administrator when launched from the EpicGamesLauncher.exe file.
You can also do the same steps for Alan Wake 2 game executable file to ensure the application has UAC access.
2. Update Graphics Drivers
Make sure to update your graphics driver on the PC because an outdated GPU driver may trigger multiple issues with the game launching. You should try checking and installing the graphics driver update (if available). To do that:
- Right-click on the Start Menu to open up the Quick Access Menu.
- Click on Device Manager from the list to open the interface.
- Now, you’ll need to double-click on Display Adapters to expand it.
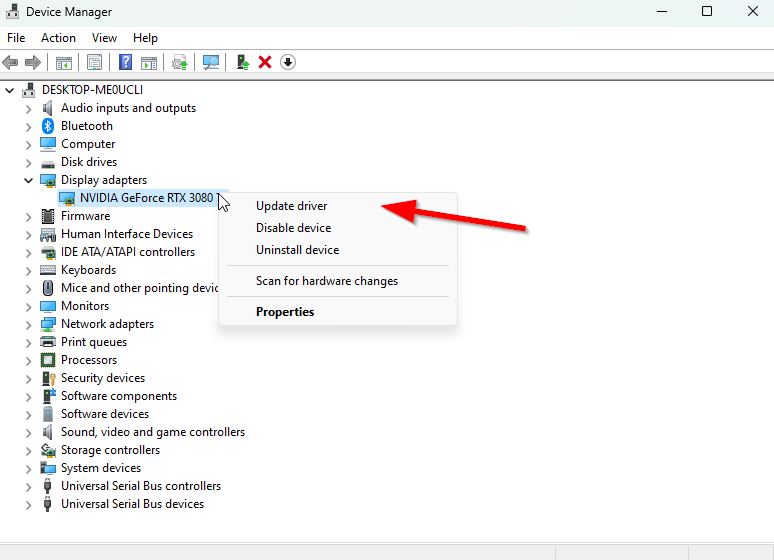
- Then, right-click on the dedicated graphics card that’s active.
- Next, click on Update driver > Choose Search automatically for drivers.
- The system will automatically check for the available updates.
- An update will automatically download and install the latest version if available.
- Once done, make sure to restart your PC to apply the changes.
If you can’t find any update, you can go to the official graphics card website and manually search for the update. If in case, a new version is available, download the file on your PC and install it. You can find out the official manufacturer’s website link below.
3. End Background Processes
Make sure to end the background process on your system because unnecessary tasks can easily trouble the resource-hungry applications to run properly. If in case, your system becomes laggy or slow, the system resources are getting low at that moment. To remove unwanted processes:
- Press the keyboard’s Ctrl + Shift + Esc shortcut keys to open Task Manager.
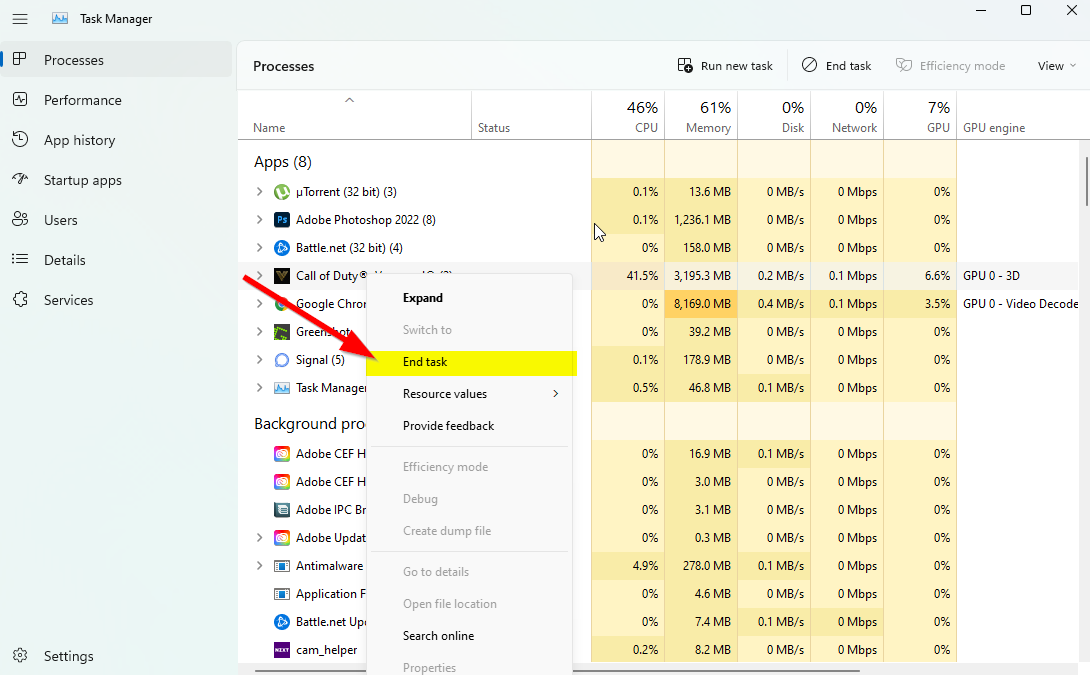
- Click on the Processes tab > Select the task you want to close individually.
- Then click on End Task to close it.
- As mentioned, do the same steps for each task you want to close.
- Once done, close the Task Manager window and restart your PC.
4. Run the game in Windowed Mode
If in case, the game seems to crash a lot, you can try setting up the Display Mode to Windowed from Full Screen. To do that:
- Click on the Windows icon to open the Start Menu > Type %LOCALAPPDATA% on the search bar and open it.
- Go to the %LOCALAPPDATA% folder > Search for the ‘Prospect’ folder.
- Open the mentioned folder and go to the Saved > Config > WindowsNoEditor directory.
- Under the WindowsNoEditor folder, you’ll find a file called ‘GameUserSettings’.
- Open the user settings file using any text editor > Set ‘FullscreenMode=1’ to ‘FullscreenMode=0’ to save changes.
- Finally, try launching the game again to check for the issue.
5. Disable DirectX 12
If you use DirectX 12 on the PC, you can try turning it off. As the DirectX 12 version is the latest one available for Windows, it may be possible that your PC configuration isn’t capable of running it. To turn it off:
- Head to Settings > Video > Set ‘Enable DX12’ to ‘Off’.
- Restart Alan Wake 2 game after applying changes.
6. Disable Multi-Threaded Rendering
The in-game video settings menu in Alan Wake 2 title seems to have a multi-threaded rendering option enabled, somehow conflicting with the game crashing quite often. Make sure to disable the multi-threaded rendering option from the game menu to try to resolve the issue. If using an AMD processor, turn it off and reboot the game to apply changes.
7. Turn Off Antivirus Protection
You should try turning off the Windows Defender protection on your PC to ensure no antivirus software is blocking the game files from running properly. To turn it off:
- Press the Windows + I shortcut keys to open the Windows Settings menu.
- Click on Update & Security > Click on Windows Security from the left pane.
- Now, click on the Open Windows Security button.
- Go to Virus & Threat Protection> Click on Manage settings.
- Next, you’ll need to turn off the Real-time protection toggle.
- If prompted, click on Yes to proceed further.
8. Repair Game Files
A corrupted or missing game files on the PC can eventually trigger multiple game launching or performance issues. To do so:
- Open the Epic Games Launcher > Click on Library.
- Click on the three-dots icon of Alan Wake 2.
- Click on Verify, and it’ll start verifying the game files.
- Wait for the process to complete and restart the launcher.
- It should fix Alan Wake 2 Crashing issue on your PC.
9. Update Alan Wake 2
If none of the methods worked for you, check for Alan Wake 2 game update because an outdated game version can have bugs or stability issues. So, if you haven’t updated your game for a while, follow the steps below to check for updates and install the latest update.
- Open the Epic Games Launcher > Head over to Library.
- Now, click on the three-dot icon of Alan Wake 2.
- Make sure the Auto Update option is turned on.
That’s it, guys. We assume this guide was helpful to you. For further queries, you can comment below.
Also Read